Monday 20 May 2013

Ancient Egyptian Art
Projects for grade SK to Grade 4
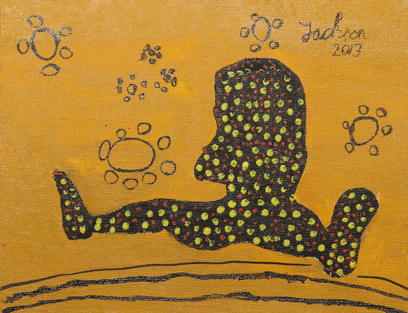
Print making technique
( This is a printmaking technique I have invented especially for children, so they experiment something similar to etching or to linocut, without using "dangerous" supplies.) 

Supplies:
wooden sharpen sticks
Styrofoam plates 
white glossy paper
drawing paper
printmaking ink
(or oil paint)
printmaking roll

Steps we took:
1. Discussing about Ancient Egyptian Art.
2. Analyzing Ancient Egyptian artworks.
4. Drawing an art composition just in line, on a piece of paper.
5. Shading all over the back of the page.
6. Cutting the styrofoam plate in a rectangle shape.
7. Placing the drawing with the shaded side on the plate.
8. Tracing the drawing in red pen. Now, because the back of the paper is all shaded in pencil, the drawing is imprinting on the styrofoam piece.
9. Drawing with the wooden stick, on the styrofoam piece, on top of the imprinted drawing.
10. Applying the ink (or oil paint) to the relief surface with a printmaking roll.
11.Transferring the image on the paper ( in the same manner used for the linocut technique)
* There is possible to obtain about 3 to 4 prints from each plate.


Introducing the Ancient Roman Art

Steps we took:
1. Learning the rules for drawing a portrait front view.
2. Drawing a portrait front view ( for about 1hour )
3. Reading about, watching and discussing Roman Ancient busts.
4. Learning how to work with clay. First, for practicing, they did a small animal.
5. Watching the teacher (me) doing quickly a bust.
6. Working on their own. 
* We have used Natural Modeling Clay.
Time for teaching all of these: about 5 hours.


Saturday 18 May 2013

Book Illustration Inspired by the Aboriginal Australian Art

This is a project I did with grade 6-8 at Howlett Academy Toronto.
At the end of every year their poems or stories are published in a small book. This year they wrote stories.
Their art illustrations for these stories are all inspired by the Aboriginal Australian Art. To do their illustrations, students had to write a very short summary of their stories and decide how it could be illustrated in just one painting. Right after, we discussed about Aboriginal Australian Art. We were looking at many Aboriginal artworks and we analyzed their way of painting, the colours and symbols they used.

The steps we took:
Students mixed colours to obtain different hues and tones of: yellow, ocher, brown, orange, red and green. They used black and white, as well. (the specific colours of the Aboriginal Australian Art).
1. Next, they drew on canvas just the outline of each shape, then they
2. painted the background.
3. Every shape was painted in a different colour than the background.

4. Dots were added in or around the shapes with a stick.
5. Every shape was outlined in black with a thin and pointed brush.
6. Aboriginal Australian symbols were added in black, red or brown ink with a thin and pointed brush.
7. At the end, they signed in black ink with a thin and pointed brush.
 8. I did the book cover.